You just had your interior walls painted — or painted them yourself — and something isn’t right. Maybe it’s peeling in the bathroom. Bubbling near a window. A patchy, uneven finish that looks nothing like the smooth walls you expected. Or you touched up a scuff and now the patch looks shinier than everything around it.
These problems are more common than most homeowners realize, and in nearly every case the cause isn’t the paint itself — it’s what happened before the paint went on, or how it was applied.
After 15+ years painting homes across Dallas and the DFW Metroplex, we’ve seen every one of these issues. This guide walks through the most common interior paint problems, what actually causes them, and what it takes to fix them properly — not just cover them up.
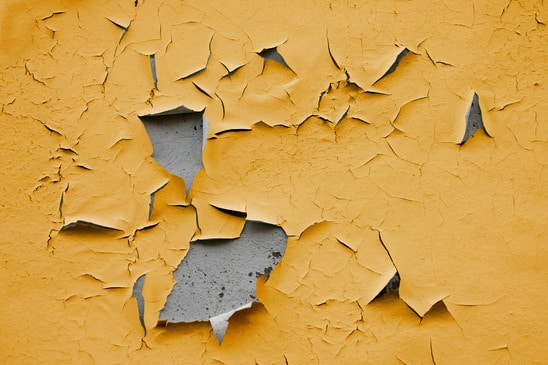
Problem #1: Peeling Paint
Peeling is one of the most frustrating paint failures because it tends to spread. What starts as a small flake in the bathroom corner becomes a larger patch within months.
What causes it:
The most common cause is moisture. Water getting behind the paint film — from a slow leak, condensation, high humidity, or painting over a surface that wasn’t fully dry — breaks the bond between the paint and the wall. Once that bond fails, the paint lifts and peels.
The second most common cause is incompatible layers. Many Dallas homes built before the 1990s have oil-based alkyd paint on the walls. Oil-based paint cures to a hard, relatively inflexible film. When latex (water-based) paint is applied directly over old alkyd without proper preparation, the two layers move at different rates during temperature and humidity cycles — and eventually the top layer shears off in sheets.
How to fix it properly:
Simply repainting over peeling paint never works. The fix requires:
- Scraping away all loose and peeling paint in the affected area
- Sanding the edges smooth so there’s no raised lip
- Identifying and addressing the moisture source if one exists
- Priming the bare surface with an appropriate primer before repainting
- Applying two full coats of quality paint
If peeling is widespread or keeps recurring in the same spot, it almost always points to an unresolved moisture issue that needs to be found and fixed before any paint goes on.
Problem #2: Bubbling or Blistering Paint
Bubbling — sometimes called blistering — looks like small raised pockets or bumps pushing up from the wall surface. It’s particularly common in kitchens, bathrooms, and on walls that get direct sun through windows.
What causes it:
Paint bubbling happens when air or moisture becomes trapped between the paint film and the surface beneath it. As temperature rises, that trapped moisture or air expands and pushes the paint outward. The most common triggers are:
- Painting over a damp or wet surface
- Painting in high heat or humidity (a real issue in Dallas summers)
- Applying a second coat before the first has fully dried
- Moisture migrating through the wall from outside or from a hidden leak
How to fix it:
Pop or scrape the bubbles, sand smooth, let the surface dry completely, prime, and repaint. If bubbling recurs, you have a moisture source that needs to be identified and fixed first. No amount of repainting will solve a moisture intrusion problem permanently.
Problem #3: Patchy or Uneven Coverage
Patchy walls — where some areas look noticeably darker, lighter, or have a different sheen than others — are one of the most common complaints we hear from homeowners who either DIYed a paint job or had a less experienced crew do the work.
What causes it:
- Uneven application — inconsistent roller pressure, not maintaining a wet edge, or skipping areas
- Porous surfaces — bare drywall, patched areas, or previously unpainted surfaces absorb paint at different rates, creating blotchy results
- Skipping primer — raw drywall, patched spots, and repaired areas need primer before topcoat or they’ll drink up the paint unevenly and show through
- One coat instead of two — a single coat almost never provides fully uniform coverage, especially over darker colors
How to fix it:
If the patchiness is from skipped primer on repaired areas, spot-prime those sections, let dry completely, then apply a full coat over the entire wall — not just the patchy spots. Touching up only the affected areas almost always makes it more noticeable, not less.
Problem #4: Paint Bleeding or Stains Showing Through
You painted over a water stain, a smoke mark, a crayon drawing, or a dark scuff — and it’s still visible through the new paint. You apply another coat. Still there. This is bleed-through, and adding more paint almost never solves it.
What causes it:
Bleed-through happens when stains or pigments from beneath the surface seep through the new paint layer. Common culprits include:
- Water damage stains (brown or yellow rings)
- Nicotine or smoke residue
- Wood tannins bleeding through from trim or paneling
- Marker, crayon, or ink marks
- Soot from fireplaces or candles
How to fix it:
The only reliable fix is a stain-blocking primer applied before the topcoat. Regular latex primer will not stop bleed-through on strong stains. The right primer depends on the stain type:
- Shellac-based primer (like Zinsser BIN) — best for severe stains, tannins, smoke, and water damage. Bonds to almost any surface.
- Oil-based primer — good for watermarks and nicotine stains
- Water-based stain blocker — suitable for light stains where low odor is a priority
Apply the stain blocker, let it dry fully, then paint over it. Two coats of topcoat after that and the stain should be gone permanently.
Problem #5: Lap Marks and Roller Marks
Lap marks are the slightly darker or raised bands you sometimes see on a wall where one section of paint dried before the adjacent section was applied. They’re especially visible in raking light — like sunlight coming through a window at an angle.
What causes it:
Paint dries as you work. If you come back and roll over an area that’s already started to dry, you create a ridge or visible line at the overlap point. This is called a lap mark. It’s more common when:
- Working in large sections without maintaining a wet edge
- Painting in hot or dry conditions (paint dries faster)
- Using low-quality paint with poor open time
- Overloading or underloading the roller inconsistently
How to fix it:
Prevention is far easier than fixing lap marks after the fact. The technique is to always maintain a wet edge — keep the roller moving and overlap each stroke into the still-wet previous stroke before it has a chance to dry. Work in manageable sections from top to bottom without stopping mid-wall.
If lap marks are already dry and visible, lightly sand the affected area, then repaint the entire wall — not just the section — in one continuous pass to avoid creating new lines.
Problem #6: Roller Texture or Brush Marks in the Finish
A good interior paint job should look smooth and uniform. If you can see heavy roller stipple texture or visible brush strokes in the dried finish, the application technique or product was wrong for the surface.
What causes it:
- Using too thick a nap on the roller for smooth walls (use 3/8″ or 1/4″ nap on drywall)
- Overworking wet paint with the brush — going back over areas that have already started to set
- Using cheap brushes that leave bristle marks
- Applying paint too thickly in a single coat
- Not back-rolling after spraying
How to fix it:
Light sanding with 220-grit sandpaper can knock down heavy texture in the dried finish. After sanding, wipe the dust clean and apply a fresh coat using proper technique — loaded but not dripping roller, consistent pressure, and no going back over areas that have started to tack up.
Problem #7: Touch-Ups That Don’t Match
This is one of the most common complaints we get on service calls. A homeowner has leftover paint from the original job, touches up a scuff or mark, and the patch looks completely different from the surrounding wall — shinier, darker, or with a visible halo around it.
What causes it:
Paint changes as it ages on the wall. Even the exact same paint from the exact same can will look different applied fresh over aged, faded paint. The touch-up reflects light differently than the surrounding surface, making it glaringly obvious.
Additionally, if the touch-up was applied with a brush to a roller-applied surface, the texture difference alone will make it visible in certain lighting conditions.
How to fix it:
- Feather the edges — don’t stop the touch-up at the damage. Apply paint to a larger area and fade the edges out so there’s no hard line
- Use the same application tool — if the wall was rolled, touch up with a small roller, not a brush
- If the paint is old, plan to repaint the full wall rather than spot touch — it will look better and last longer
- For significant sheen mismatch, lightly scuff the surrounding area with a fine abrasive pad before touching up to reduce the gloss differential
Problem #8: Paint Drying Too Slowly
Paint that stays tacky or soft for days after application is a sign something went wrong during the job — and it leaves the surface vulnerable to damage, dents, and marks while it waits to cure.
What causes it:
- High humidity during application — very relevant in Dallas, especially late spring and summer
- Applying coats too thick
- Inadequate ventilation
- Very cold temperatures (less common in Dallas but possible in winter)
- Painting over a glossy surface without proper prep, which prevents adhesion and slows cure
How to fix it:
Improve ventilation — open windows, run fans, run the HVAC. If the paint remains soft after several days, the coat may be too thick and may need to be removed and reapplied correctly. Prevention is the real fix: always apply thin, even coats and ensure adequate airflow during and after the job.
The Common Thread: Almost Every Paint Problem Comes Down to Prep
After 15 years and hundreds of Dallas homes, the pattern is clear — paint failures are almost never about the paint. They’re about what happened before the paint went on.
Proper prep is the foundation of a long-lasting finish. That means:
- Cleaning surfaces thoroughly before painting
- Repairing cracks, holes, and damaged drywall
- Priming bare surfaces, patches, and stained areas
- Addressing moisture before it gets sealed under paint
- Choosing the right products for the surface and conditions
Good paint cannot compensate for poor preparation. A premium Sherwin-Williams or Benjamin Moore product applied over an unprepped surface will fail just as quickly as a budget paint — sometimes faster, because premium paints are formulated to bond well to properly prepared surfaces.
When to Call a Professional
Some paint problems are straightforward DIY fixes. Others signal something deeper going on that a fresh coat of paint won’t solve. Consider calling a professional if:
- Peeling or bubbling keeps recurring in the same spot after repainting
- You see brown or yellow stains after two coats of primer
- There’s a musty odor or soft spots in the drywall near the paint failure
- The problem covers a large area or multiple rooms
- You’re dealing with a whole-home repaint where surface conditions vary
At East Dallas Painting, we assess surfaces before we ever open a can of paint. We identify what’s causing the problem, fix it at the source, and apply the right products in the right order — so the finish lasts.
Dealing with a Paint Problem in Your Dallas Home?
We offer free estimates and honest assessments. If something isn’t right with your walls, we’ll tell you exactly what’s causing it and what it will take to fix it properly.
Call us today: 📞 214-612-6235 | 877-275-8751 📧 info@eastdallaspainting.com
Or book directly online — we’ll come to you, assess the surfaces, and give you a straight answer.
East Dallas Painting serves Dallas, Plano, Richardson, Garland, Mesquite, Rockwall, and the greater DFW Metroplex.